Octopus Deploy and Entity Framework migrations
 A step that is very common in almost every deployment pipeline is the migration of the database. In this blog I’ll show you how to do this using Octopus Deploy and Entity Framework Migrations. I’ll be using a very simple ASP.Net MVC application called SimpleMVCApp. In the same solution, I’ve created a library project named SimpleMVCApp.Data in which my context, models, migrations and migration scripts reside. This application can be found on my GitHub account.
Migrating
 On the left, you find an image which shows the content of the SimpleMVCApp.data project. As you can see there’s my FruitContext, a models folder and a migrations folder. These are all standard components which should look familiar when you’ve ever worked with EF and migrations. What’s extra is het Scripts folder in which you find a PowerShell file called MigrateDatabase.ps1. This script is quite simple and shown below.
Param(
  [Parameter(Mandatory=$true)]
  [string]$connectionString
)

.\migrate.exe SimpleMVCApp.Data.dll /connectionString="$($connectionString)" /connectionProviderName="System.Data.SqlClient"
The first lines define the connectionstring parameter. We will define this in Octopus Deploy later. The last line is where the work is done. Here we are using migrate.exe and pass in some arguments. The first argument is the dll in which your context and migrations reside, the other arguments are self-explanatory. You may wonder where this migrate.exe comes from. This was downloaded when you installed the EF NuGet package and can be found in packages\EntityFramework.6.1.3\tools. This .exe is also used when you use the Package Manager Console in Visual Studio and issue an Update-Database command. We get this from the package folder to make sure it’s always up to date. If you update EF in your project, this file will be updated as well.
In EF there’s an option to have your database migrated from code using AutomaticMigrationsEnabled = true;. I decided not to use this and have Octopus doing it for me. A very important reason for this is visibility. Doing it in Octopus means that whatever migrate.exe returns is gets logged and is visible for everyone. When the migration fails this also means the deployment will fail.
Creating a package
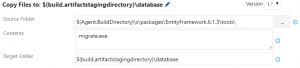
In a previous blog, I showed you how you can create a package of a project in TFS Build and push this to Octopus. Here we will use the same technique to create a package in which we will place the required files to perform the database migrations. Open up your browser and navigate to your TFS 2015 build definition. Here we’ll add three “Copy files”-steps, as shown below. The first one copies the bin folder of the SimpleMVCApp.Data build output to $(build.artifactstagingdirectory)\database. The second task copies the content of the Scripts folder, our MigrateDatabase.ps1, and the third task copies the migrate.exe.


Now we add a new “Octopus Package”-step to create a package of the $(build.artifactstagingdirectory)\database folder. We name this one SimpleMvc.App.Database. The last thing we need to do in TFS is add an “Octopus Push Package”-step to push the package we just created to Octopus.CreatePackage
 Now the package has been pushed to Octopus we should add an extra step to your release process. Choose a Run Script task and name it something like Migrate Database. Set Script source to Script file inside a package and select your package from the list. In the Script section you fill in the name of our migration script; MigrateDatabase.ps1. Don’t forget to add a variable named ‘DatabaseConnectionString’ to the variables section of your Octopus project and add the following “-connectionString “#{DatabaseConnectionString}”” to the Script parameters field. Now check-in a migration and make sure a release gets triggered in Octopus. You should see an output similar to the image below.

No rollbacks
You might have noticed there’s nothing in here about rolling back your database migrations. That’s on purpose. I always make sure that a migration is backwards compatible. This means that if a migration fails, the application should still run. This also means that renaming or deleting a column, for example, is no longer allowed (you should add a column, migrate data and then delete it in a later migration when you are sure that version of the database is no longer being used). Now you’ve automated this step, this will run and thereby have tested your migration at least multiple times before it will be run against your production database. Now if you make sure, and this is critical, that this migration in run against a database very similar to your production database in terms of size en server capabilities, there’s no reason why this migration should fail you on production.