Generating API clients using NSwag and Azure DevOps
Whenever you create an API you probably want to be able to create some documentation around that API. Swagger has been around for a long time and allows you to explore and test your API using a nice UI in the browser. It also provides you with an OpenAPI spec in json format describing your service. OpenAPI is to REST what WSDL is to an SOAP-endpoint. Wouldn’t it be cool if you could generate your clients using that spec? Well, you can!
NSwag
NSwag is a Swagger/OpenAPI 2.0 and 3.0 toolchain for .NET, .NET Core, Web API, ASP.NET Core, TypeScript (jQuery, AngularJS, Angular 2+, Aurelia, KnockoutJS and more) and other platforms, written in C#. The Swagger specification uses JSON and JSON Schema to describe a RESTful Web API. The NSwag project provides tools to generate Swagger specifications from existing ASP.NET Web API controllers and client code from these Swagger specifications.
NSwag allows us to generate client code without having your API running where many other generators require you to do that which means we can easily run it in the build pipeline without actually running the app. In this blog I’ll show you how to generate the client code and create a pull-request on your client app to integrate that change automatically.
Demo ASP .NET Core API
We’re going to quickly setup a demo app. Run the following command on the commandline:
dotnet new webapi
Adding NSwag to that project just requires a few steps. First, add the NuGet:
dotnet add package NSwag.AspNetCore
Open Startup.cs and find the ConfigureServices method, register the required Swagger services:
public void ConfigureServices(IServiceCollection services)
{
    services.AddControllers();

    // Register the Swagger services
    services.AddSwaggerDocument();
}
Find the Configure method, enable the middleware for serving the generated Swagger specification and the Swagger UI:
public void Configure(IApplicationBuilder app, IWebHostEnvironment env)
{
    if (env.IsDevelopment())
    {
        app.UseDeveloperExceptionPage();
    }
    // Register the Swagger generator and the Swagger UI middlewares
    app.UseOpenApi();
    app.UseSwaggerUi3();

    app.UseHttpsRedirection();

    app.UseRouting();

    app.UseAuthorization();

    app.UseEndpoints(endpoints =>
    {
        endpoints.MapControllers();
    });
}
You can now run your app and navigate to http://localhost:5001/swagger and you should be presented with the Swagger UI! This doesn’t generate a client yet. We need a few extra steps in the project. Run the following command to add the NSwag NuGet package that runs the client generation on every build:
dotnet add package NSwag.MSBuild
Add the following lines to your project file:
<Target Name="NSwag" AfterTargets="Build">
  <Copy SourceFiles="@(ReferencePath)" DestinationFolder="$(OutDir)References" />
  <Exec Command="$(NSwagExe_Core31) run nswag.json /variables:Configuration=$(Configuration),OutDir=$(OutDir)" />
  <RemoveDir Directories="$(OutDir)References" />
</Target>
This will call the NSwag generator and provide that with a nswag.json as input. That nswag.json is the NSwag Configuration Document that can be generated using NSwag Studio. You can also use the example below. Just add that to the root of your project and add it to sourcecontrol.
{
  "runtime": "NetCore31",
  "defaultVariables": null,
  "documentGenerator": {
    "aspNetCoreToOpenApi": {
      "project": "nswag.csproj",
      "msBuildProjectExtensionsPath": null,
      "configuration": null,
      "runtime": "",
      "targetFramework": "netcoreapp3.1",
      "noBuild": false,
      "verbose": true,
      "workingDirectory": null,
      "requireParametersWithoutDefault": true,
      "apiGroupNames": null,
      "defaultPropertyNameHandling": "CamelCase",
      "defaultReferenceTypeNullHandling": "Null",
      "defaultDictionaryValueReferenceTypeNullHandling": "NotNull",
      "defaultResponseReferenceTypeNullHandling": "NotNull",
      "defaultEnumHandling": "Integer",
      "flattenInheritanceHierarchy": false,
      "generateKnownTypes": true,
      "generateEnumMappingDescription": false,
      "generateXmlObjects": false,
      "generateAbstractProperties": true,
      "generateAbstractSchemas": true,
      "ignoreObsoleteProperties": false,
      "allowReferencesWithProperties": false,
      "excludedTypeNames": [],
      "serviceHost": null,
      "serviceBasePath": null,
      "serviceSchemes": [],
      "infoTitle": "My Title",
      "infoDescription": null,
      "infoVersion": "1.0.0",
      "documentTemplate": null,
      "documentProcessorTypes": [],
      "operationProcessorTypes": [],
      "typeNameGeneratorType": null,
      "schemaNameGeneratorType": null,
      "contractResolverType": null,
      "serializerSettingsType": null,
      "useDocumentProvider": false,
      "documentName": "v1",
      "aspNetCoreEnvironment": null,
      "createWebHostBuilderMethod": null,
      "startupType": null,
      "allowNullableBodyParameters": true,
      "output": null,
      "outputType": "OpenApi3",
      "assemblyPaths": [],
      "assemblyConfig": null,
      "referencePaths": [],
      "useNuGetCache": false
    }
  },
  "codeGenerators": {
    "openApiToTypeScriptClient": {
      "className": "{controller}Client",
      "moduleName": "",
      "namespace": "",
      "typeScriptVersion": 2.7,
      "template": "Angular",
      "promiseType": "Promise",
      "httpClass": "HttpClient",
      "useSingletonProvider": false,
      "injectionTokenType": "InjectionToken",
      "rxJsVersion": 6.0,
      "dateTimeType": "OffsetMomentJS",
      "nullValue": "Undefined",
      "generateClientClasses": true,
      "generateClientInterfaces": true,
      "generateOptionalParameters": true,
      "exportTypes": true,
      "wrapDtoExceptions": false,
      "exceptionClass": "ApiException",
      "clientBaseClass": "",
      "wrapResponses": false,
      "wrapResponseMethods": [],
      "generateResponseClasses": true,
      "responseClass": "ApiResponse",
      "protectedMethods": [],
      "configurationClass": null,
      "useTransformOptionsMethod": false,
      "useTransformResultMethod": false,
      "generateDtoTypes": true,
      "operationGenerationMode": "MultipleClientsFromPathSegments",
      "markOptionalProperties": false,
      "generateCloneMethod": false,
      "typeStyle": "Class",
      "classTypes": [],
      "extendedClasses": [],
      "extensionCode": "",
      "generateDefaultValues": true,
      "excludedTypeNames": [],
      "excludedParameterNames": [],
      "handleReferences": true,
      "generateConstructorInterface": true,
      "convertConstructorInterfaceData": false,
      "importRequiredTypes": true,
      "useGetBaseUrlMethod": false,
      "baseUrlTokenName": "API_BASE_URL",
      "queryNullValue": "",
      "inlineNamedDictionaries": false,
      "inlineNamedAny": false,
      "templateDirectory": null,
      "typeNameGeneratorType": null,
      "propertyNameGeneratorType": null,
      "enumNameGeneratorType": null,
      "serviceHost": null,
      "serviceSchemes": null,
      "output": "api.generated.clients.ts"
    }
  }
}
Generating the client during a merge build
The goal of the build that we are going to create here is to generate the client whenever a pr has been merged to the master branch. When that client gets created I want to create a pull request on the Angular project that uses it to update that code. I do that using a multi-stage pipeline in Azure DevOps. Let’s first focus on the client generation. Here’s the yaml pipeline that does that. First, we restore NuGets and build the API. The generated client is then copied to the build artifacts folder and uploaded. Notice the add of the resource section to tell the build that we want to use the Angular app’s repository as well. We need that later on the create the pr. Add this pipeline to source-control and create the pipeline in Azure DevOps pointing to this file.
trigger:
- master

pr: none

pool:
  vmImage: 'ubuntu-latest'

variables:
  buildConfiguration: 'Release'
  System_AccessToken: $(System.AccessToken)

resources:
  repositories:
  - repository: AngularApp
    type: git
    name: AngularApp

stages:
- stage: 'BuildAndGenerateClient'
  displayName: 'Build and generate client'
  jobs:
    - job: 'BuildAndGenerateClient'
      steps:
      - task: DotNetCoreCLI@2
        displayName: 'Restore'
        inputs:
          command: 'restore'
          projects: '**/*.csproj'
          feedsToUse: 'select'
      - task: DotNetCoreCLI@2
        displayName: 'Build'
        inputs:
          command: 'build'
          projects: '**/*.csproj'
      - task: CopyFiles@2
        displayName: 'Publish client'
        inputs:
          SourceFolder: '$(Build.SourcesDirectory)/api-client'
          Contents: '**'
          TargetFolder: '$(Build.ArtifactStagingDirectory)/api-client'
      - task: PublishBuildArtifacts@1
        displayName: 'Publish generated client'
        inputs:
          PathtoPublish: '$(Build.ArtifactStagingDirectory)/api-client'
          ArtifactName: 'generated-client'
          publishLocation: 'Container'
Pull-request creation
Now that we have that in place it’s time to create the stage in the pipeline that creates the pull-request on the other repository. That required us to first download the artifact that we uploaded in the previous stage. We then run a full git commands to create a new branch, add the change, commit the change and push that to the server. Last but not least we run a task to create the PR in Azure DevOps. To do that final step we have to install this 3rd party task.
The user that runs the build, by default called something like ‘ needs permissions to be able to perform the tasks. Go to project settings, repositories and find the repo of the client app. Navigate to permissions and make sure that your build service has at least ‘Contribute’, ‘Contribute to pull requests’ and ‘Create Branch’ permissions. It also needs an access token to authenticate in the first place. The step to enable that has already been added to the yaml definition below:
env:
  System_AccessToken: $(System.AccessToken)
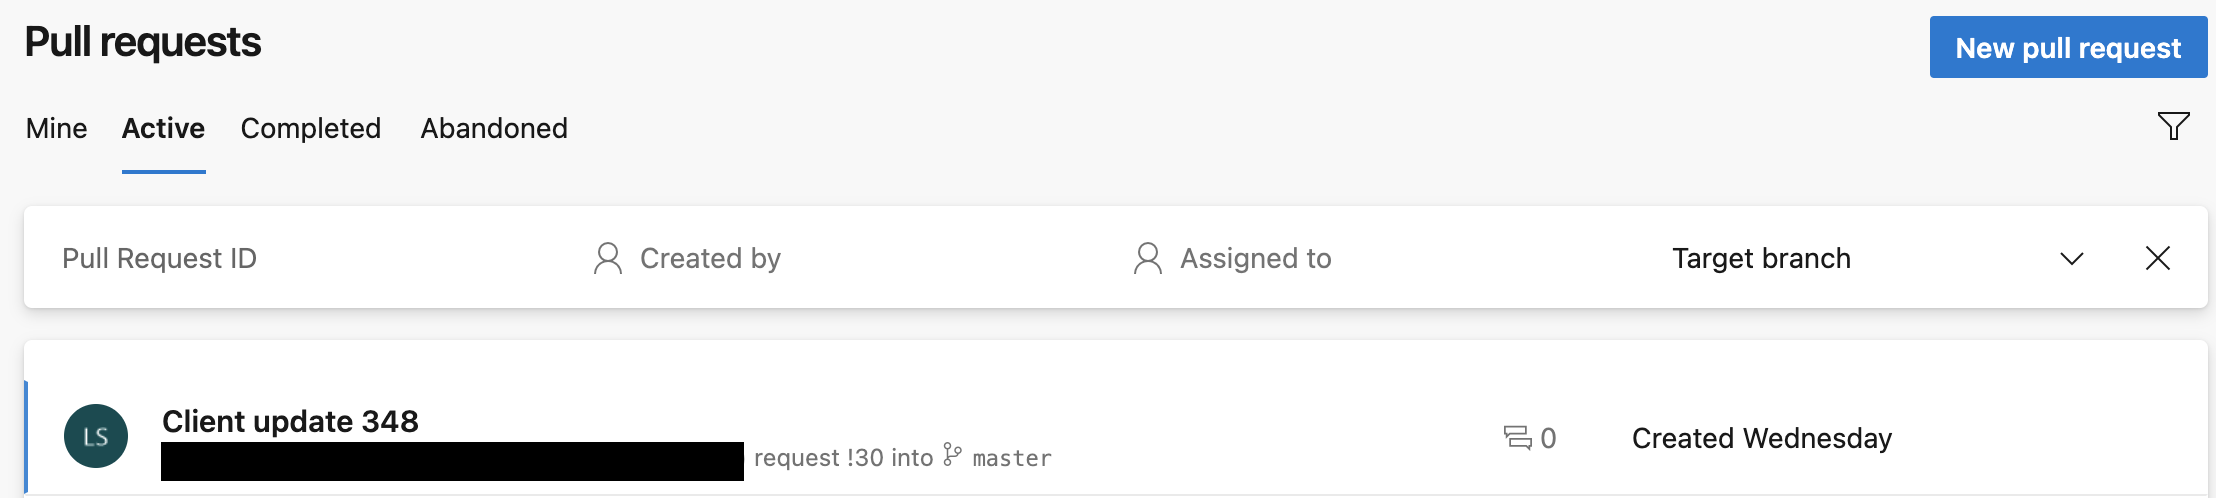
Below you will find the complete yaml definition of the second stage. Add it to your pipeline file. Notice that it also defines another pool to use. That’s because the Create PR task only runs on Windows. When you know run the pipeline and go to your pull-requests view you should see a result similar to mine:
- stage: 'CreatePrForClient'
  displayName: 'PR for client'
  pool:
   vmImage: 'windows-latest'
  jobs:
    - job: 'GeneratePR'
      steps:
      - checkout: AngularApp
        persistCredentials: true
      - task: DownloadBuildArtifacts@0
        displayName: 'Download generated file'
        inputs:
          buildType: 'current'
          downloadType: 'single'
          artifactName: 'generated-client'
          downloadPath: '$(System.DefaultWorkingDirectory)'
      - task: CopyFiles@2
        displayName: 'Copy generated file'
        inputs:
          SourceFolder: '$(System.DefaultWorkingDirectory)'
          Contents: 'generated-client/api-client-generated.ts'
          TargetFolder: 'src/app/api-client'
          OverWrite: true
          flattenFolders: true
      - task: CmdLine@2
        displayName: 'Create branch and push'
        inputs:
          script: |
            git config --global user.email $(Build.RequestedForEmail)
            git config --global user.name "$(Build.RequestedFor)"
            git checkout -b feature/client-upgrade-$(Build.BuildId) -q

            git add .

            git commit -m "Automatic PR creation for upgrading client"

            git push origin feature/client-upgrade-$(Build.BuildId) -q
      - task: CreatePullRequest@1
        displayName: 'Create PR'
        inputs:
          repoType: 'Azure DevOps'
          repositorySelector: 'select'
          projectId: '<projectId>'
          gitRepositoryId: '<gitRepositoryId>'
          sourceBranch: 'feature/client-upgrade-$(Build.BuildId)'
          targetBranch: 'master'
          title: 'Client update $(Build.BuildId)'
          description: 'Client update $(Build.BuildId)'
          linkWorkItems: true
        env:
          System_AccessToken: $(System.AccessToken)